
On internet you will find many diy fm transmitter FM transmitter schematics but one thing you often observe in many big and small circuit of FM transmitters is that they are not stable so they drift their frequency as the battery voltage goes down or if any one touch the circuit or come near to the
circuit. So we often feel the requirement of a stable FM transmitter which will not drift its frequency when some one come near to the circuit or by increasing or decreasing the voltage, this is possible by using a crystal in the transmitter circuit. We can also say it crystal controlled FM transmitter.
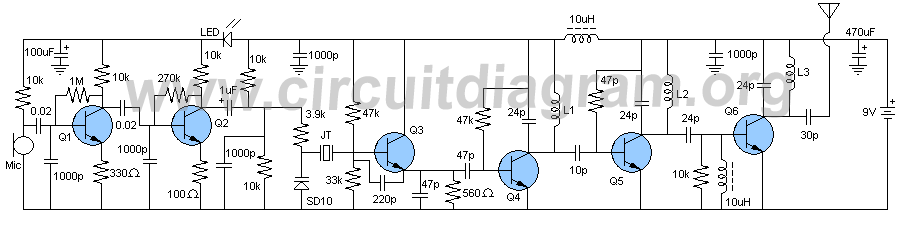
In the below FM transmitter schematic a crystal oscillator circuit is used effectively to avoide the frequency drifting and also the power amplifier stages are used to further increase the output power to receive the signal to long distance. The final output of this crystal transmitter circuit is 80mW which is a good output power to broadcast the signal up to 1km with a good antenna and FM receiver.
The crystal marked JT in the transmitter schematic is a 49.860MHz overtone type crystal. Use transisor C945 or C9014 as Q1 and Q2 and use C1975 or C9018 transistor in the place of Q3, Q4 and Q5. Transistor Q6 is the final output transistor which can be C2581 or C2053. The coil L1 and L3 are equal to 5 turns of 0.8mm enameled wire wound on 4mm form and coil L2 is equal to 4 turns of 0.8mm enameled wire wound on 4mm form, all the above mentioned coil L1, L2 and L3 are air cored. Use 1.5 meter wire as antenna. The input voltage is 9V DC.
To adjust the transmitter to its maximum output use field strength meter and adjust the coil L1, L2 and L3 by increasing and desreasing gap between the coil turns and stop when the circuit is tuned to its maximum output. Fix the circuit in the metal case and connect the ground wire with the case.
Note: This circuit is for educational purpose only.
Crystal Controlled FM Transmitter
Related Circuits


Copyright 2013 © CircuitDiagram.Org. All rights reserved.
Sponsored Links